
Are you wondering how to shuffle PowerPoint slides? Maybe you’re using PowerPoint to quiz your audience or yourself and you want to shuffle your questions, maybe you have a deck of warm-up questions to randomly choose, or maybe you want to randomly select names or topics planted in a deck! Whatever you need to shuffle PowerPoint slides for, here is the step-by-step guide on how to randomly present your slides.
First, a warning: we will be using the help of a little bit of coding! But do not worry, you will mainly just have to paste the code provided. (it’s not difficult and it’s all done inside PowerPoint!)
Second, your goal: how do you want your slides shuffled? Do you want the shuffle your PowerPoint slides once through without repeats or duplicates? Or do you want to randomly shuffle slides – repeats & duplicates allowed?
Below, we will walk you through the steps for two versions:
- How to shuffle slides with no duplicates
- How to shuffle slides and include repeats to really make it random.
If you are only interested in one version, use the Table of Contents to navigate below, or if you like to learn by watching, check out the video guide. 👇
Table of Contents
Version 1: How to Shuffle PowerPoint Slides with No Duplicates
Step 1: Enable the PowerPoint Developer Tab
To get started in shuffling PowerPoint slides, you will need to access the Developer tab on your PowerPoint ribbon. This tab by default does not automatically appear, so you can enable it by right-clicking anywhere on the top ribbon, then clicking Customize Ribbon. Find “Developer” in the menu on the right and check the box next to it. Now the Developer tab will appear on the PowerPoint ribbon and you’re ready to begin!
Step 2: Create Macro
Click the Macro button within the Developer tab. This will open the Visual Basic editor so that you can paste the code. The VBA (Visual Basic for Applications) Editor is a place where you can write VBA code and create macros. For this process, you just need to paste the code in the next step – no writing necessary!
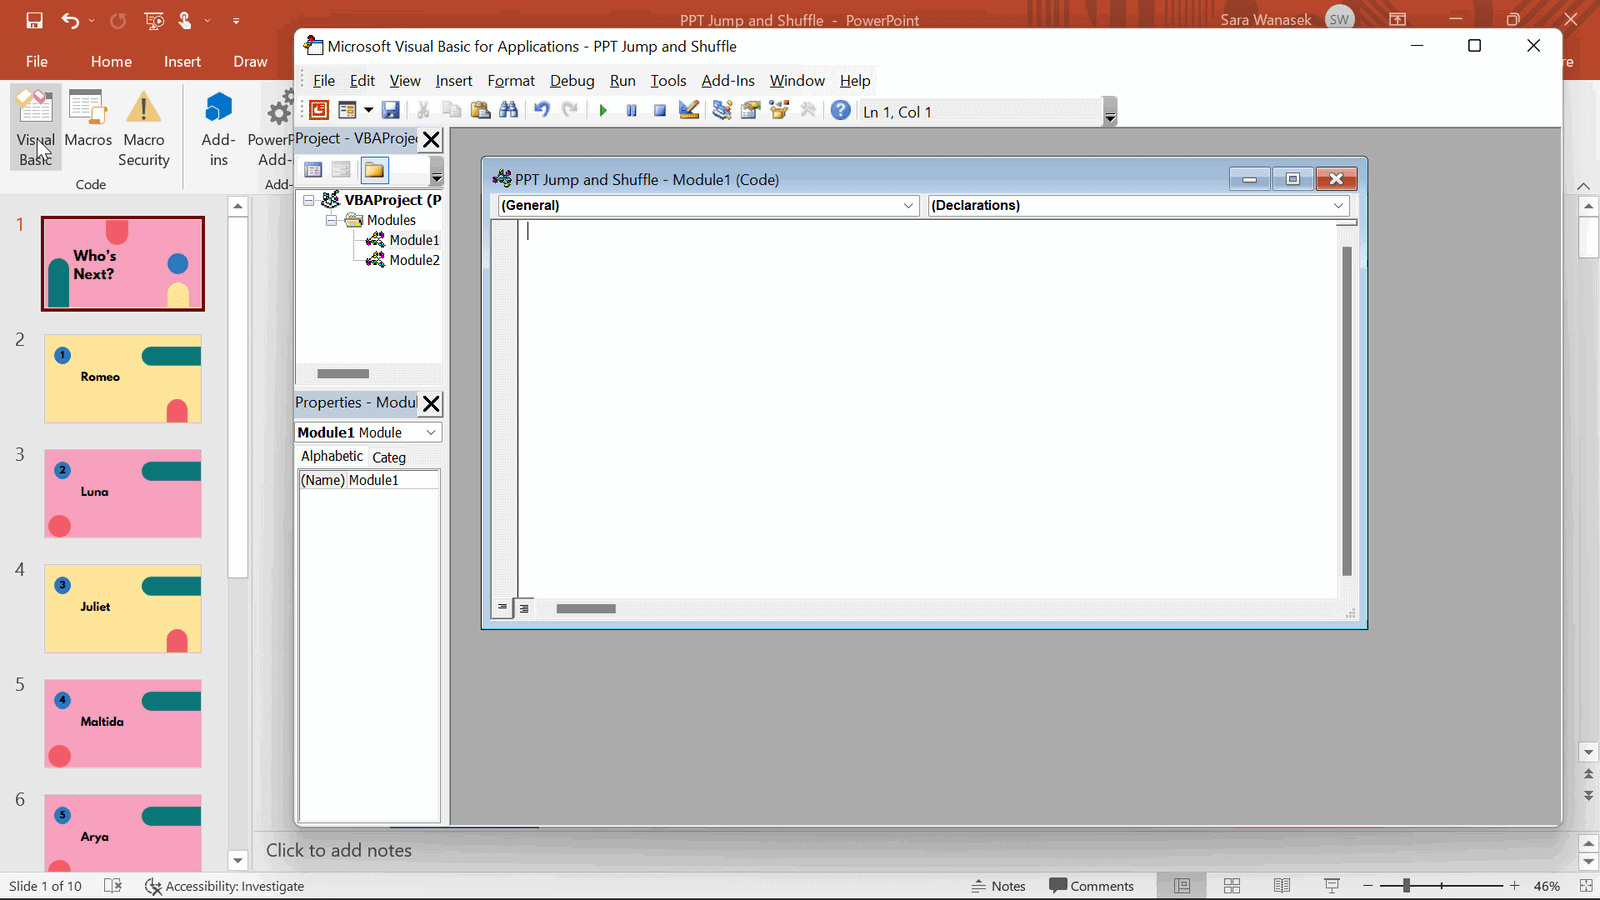
Step 3: Paste VBA Code
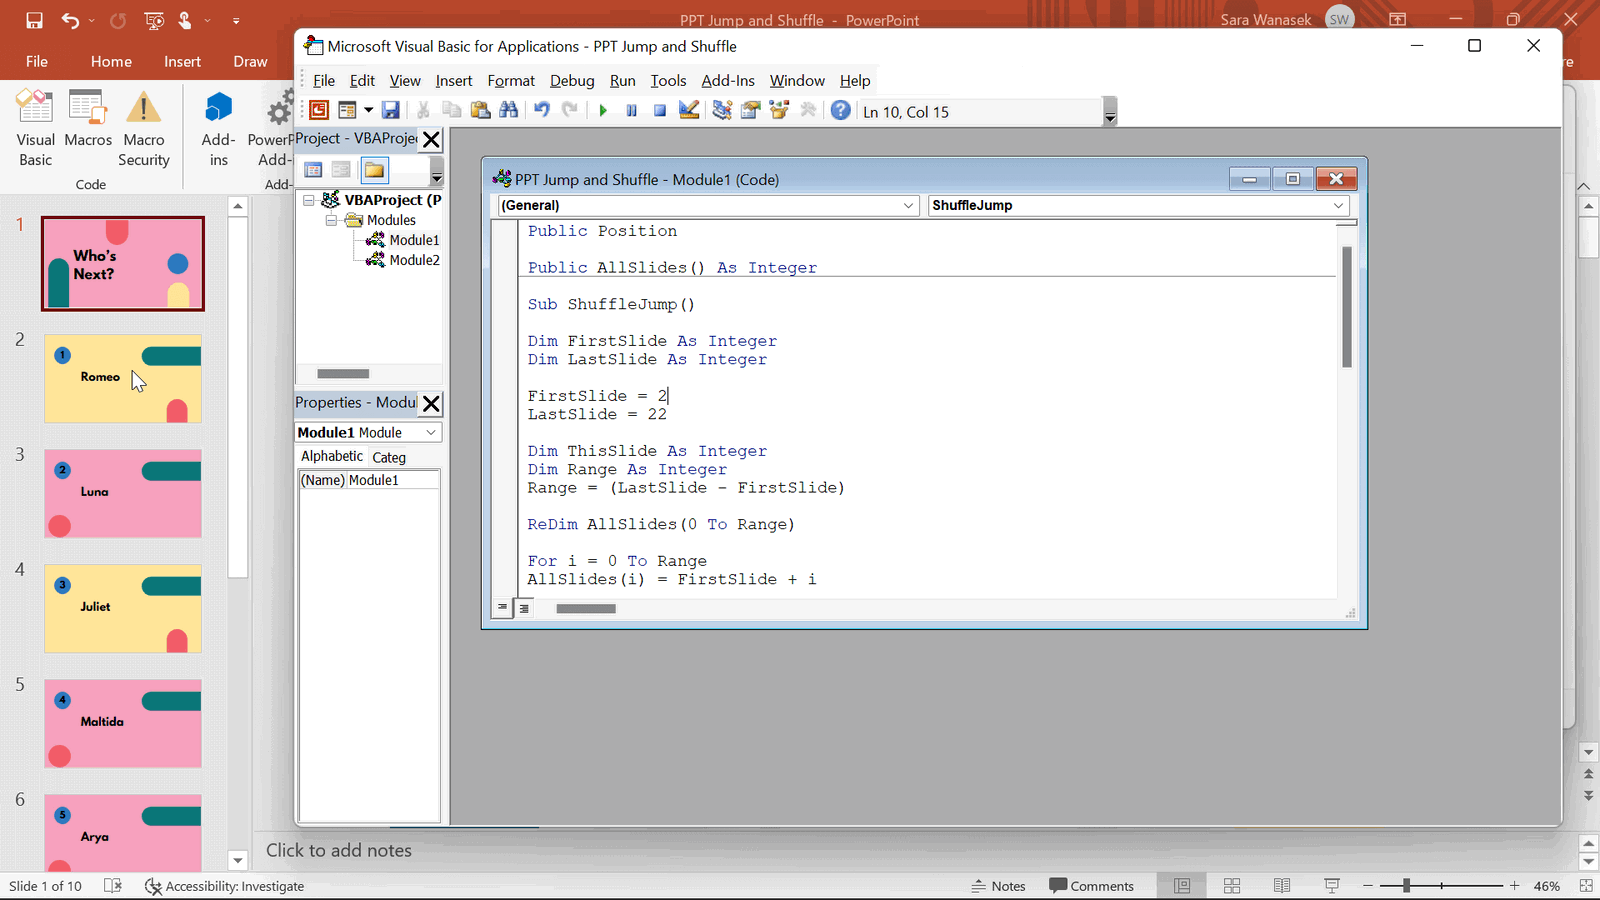
Copy this code, and paste it into the open Visual Basic window.
Public Position
Public AllSlides() As Integer

Sub ShuffleJump()

Dim FirstSlide As Integer
Dim LastSlide As Integer

FirstSlide = 2
LastSlide = 22

Dim ThisSlide As Integer
Dim Range As Integer
Range = (LastSlide - FirstSlide)

ReDim AllSlides(0 To Range)

For i = 0 To Range
AllSlides(i) = FirstSlide + i
Next

Dim N As Long
Dim temp As Variant
Dim K As Long
Randomize
For N = LBound(AllSlides) To UBound(AllSlides)
J = CLng(((UBound(AllSlides) - N) * Rnd) + N)
If N <> J Then
temp = AllSlides(N)
AllSlides(N) = AllSlides(J)
AllSlides(J) = temp

End If
Next N

Position = 0

ActivePresentation.SlideShowWindow.View.GotoSlide AllSlides(Position)

End Sub

Sub RandomSlide()

Position = Position + 1
If Position > UBound(AllSlides) Then
ActivePresentation.SlideShowWindow.View.GotoSlide (1)

End If

ActivePresentation.SlideShowWindow.View.GotoSlide AllSlides(Position)

End Sub
Step 4: Customize VBA Code
1. Determine Shuffle Range
The code you just pasted states that slides 2 through 22 will be shuffled; however, you may not have 22 slides in your presentation. Don’t worry! We can customize this section of the code.
In your VBA Editor, change the number that follows the FirstSlide and the LastSlide to the first and last slide, you want to include in your shuffle. The code starts the shuffle with slide 2 because we did not want the title slide to be included. Keep FirstSlide = 2 if you want to omit your title slides from the shuffling process.
For example, if I had a presentation with 10 slides, and I didn’t want to shuffle the title slide, I would have FirstSlide = 2 and LastSlide = 10.
2. Determine How to End the Shuffle
- Option 1: Start Over
In the second piece of this code, the Sub RandomSlide, you see the line of code ActivePresentation.SlideShowWindow.View.GotoSlide (1) This line means that after all the slides have been shuffled, you will be taken back to the first slide so that you can begin again if needed.
- Option 2: End on Last Slide
If you would prefer to end your presentation on your last slide after all the slides have shuffled through instead of going back to your first slide, then you can change the (1) in the ActivePresentation.SlideShowWindow.View.GotoSlide (1) line to the number of your last slide.
For example, if I have a Title Slide (Slide 1), 4 slides to shuffle (Slide 2-5), and a concluding slide (Slide 6), my range would be: FirstSlide = 2 & LastSlide = 5. Then, I would change the (1) in the ActivePresentation.SlideShowWindow.View.GotoSlide (1) to be ActivePresentation.SlideShowWindow.View.GotoSlide (6). For a visual of this process, please watch the video beginning at 4:23.
Step 5: Add Action Buttons to Slides
Now that the code is completed and updated to fit your presentation, you need to add buttons on the slides to run the Macro you just created. To do this, add any shape (really any shape, color, or size that works for your presentation) to the first slide from the Insert tab. To turn your shape into an action button, click on the shape, and in the Insert tab click Action. A menu will appear. Ensure you are in the Mouse Click section at the top of the window, select Run Macro, and choose the Macro ShuffleJump.
Then, repeat this process for the next slide. However, instead of choosing ShuffleJump for the Macro, choose the Macro RandomSlide. You can now copy and paste this button to each of the slides in your shuffle range.
Step 6: Save as PPTM
When that is all complete, do not forget to save your presentation, and even more importantly, you will have to save this presentation as a PPTM, a Macro enabled presentation. This way the Macros you just created will not be lost!
Step 7: Test it Out
Now the fun part – test it out! Get into Presentation Mode and click the button you made on the first slide to shuffle your slides. PowerPoint will automatically move you to a random slide in your presentation. Keep clicking the buttons to continue moving from one random slide to the next. You will notice that all the slides are shuffled – no repeats! If you are looking to randomly shuffle PowerPoint slides including repeats, take a look at the next section.
Version 2: Randomly Shuffle PowerPoint Slides With Duplicates
Step 1: Enable the PowerPoint Developer Tab
Similar to Version 1, if you want to shuffle PowerPoint slides with no duplicates, you will need to access the Developer tab on your PowerPoint ribbon. By default, this tab does not automatically appear, so you can enable it by right-clicking anywhere on the top ribbon, then clicking Customize Ribbon. Find “Developer” in the menu on the right and check the box next to it. Now the Developer tab will appear on the PowerPoint ribbon and you’re ready to begin!
Step 2: Create Macro
Click the Macro button within the Developer tab. This will open the Visual Basic editor so that you can paste the code. The VBA (Visual Basic for Applications) Editor is a place where you can write VBA code and create macros. For this process, you just need to paste the code in the next step – no writing necessary!
Step 3: Paste VBA Code
Copy this code, and paste it into the open Visual Basic window.
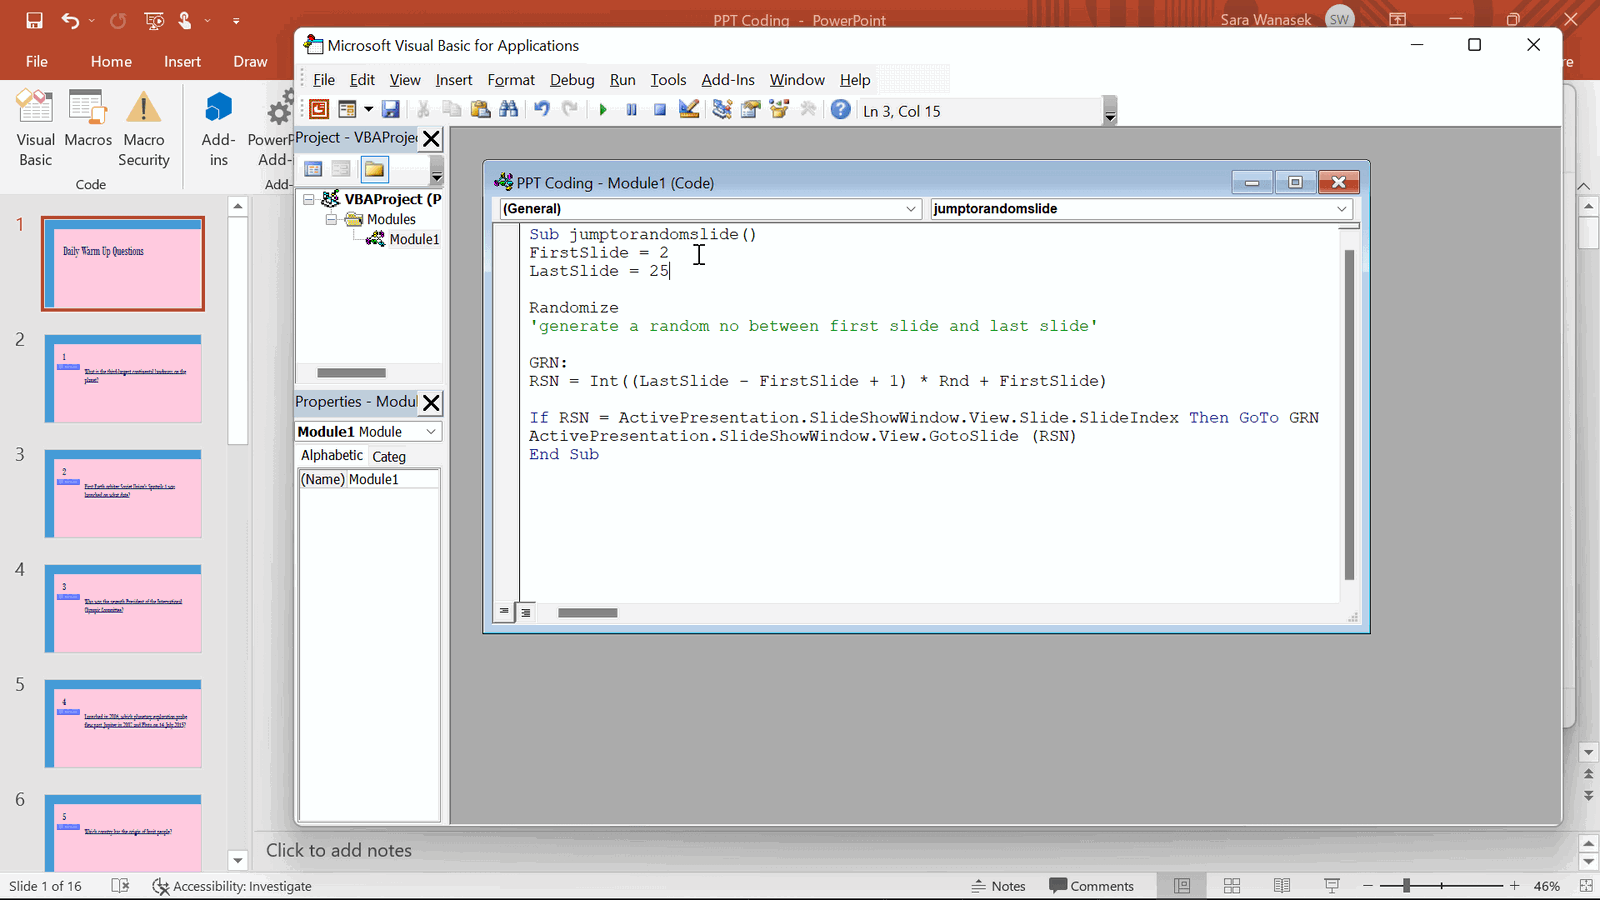
Sub Jumptorandomslide()

FirstSlide = 2
LastSlide = 25

Randomize
'generate a random no between first slide and last slide'

GRN:
RSN = Int((LastSlide - FirstSlide + 1) * Rnd + FirstSlide)

If RSN = ActivePresentation.SlideShowWindow.View.Slide.SlideIndex Then GoTo GRN
ActivePresentation.SlideShowWindow.View.GotoSlide (RSN)

End Sub
Step 4: Customize VBA Code
The code you just pasted states that slides 2 through 22 will be shuffled; however, you may not have 22 slides in your presentation. Don’t worry! We can customize this section of the code.
In your VBA Editor, change the number that follows the FirstSlide and the LastSlide to the first and last slide you want to include in your shuffle. The code starts the shuffle with slide 2 because we did not want the title slide to be included. Keep FirstSlide = 2 if you want to omit your title slides from the shuffling process.
For example, if I had a presentation with 10 slides, including a title slide I wanted to omit, I would only change the number 22, to 10 after LastSlide.
Step 5: Add Action Buttons to Slides
Now that the code is completed and updated to fit your presentation, you need to add buttons on the slides to run the Macro you just created. To do this, add any shape to the first slide from the Insert tab. To turn your shape into an action button, click on the shape, and in the Insert tab click Action. A menu will appear. Ensure you are in the Mouse Click section at the top of the window, select Run Macro, and choose the Macro JumpToRandomSlide.
Copy this button and add it to every slide in your shuffle range! This will allow you to keep jumping from random slide to random slide during the presentation.
Step 6: Test it Out
Now to the fun part: testing it out! Get into Presentation Mode and click the button you made on the first slide to shuffle your slides. PowerPoint will automatically jump to a random slide. Because the slides are randomly selected like rolling dice, you may see a slide twice before you see every slide. If you want to avoid duplicates, then follow the steps and use the code in the section above.
Step 7: Save as a PPTM
When that is all complete, you must save your presentation as a PPTM, a Macro-enabled presentation. This way the Macros you just created will not be lost!
Now you know how to shuffle your PowerPoint slides like a pro!
However, if you are using this technique to randomly call on your students by creating a slide with each student’s name there is a code-free method using the add-in, ClassPoint, and the free name picker tool embedded right in PowerPoint.
Randomly Pick Names with ClassPoint
To randomly select names from your audience or your class, save time by drawing names right in PowerPoint using ClassPoint! ClassPoint is a Microsoft PowerPoint add-in designed to improve presentation delivery, and audience engagement with added presentation tools such as student response questions, annotation & whiteboard tools, and other teaching tools including the random Name Picker.
To do this, you just have to click on the Name Picker icon located in the ClassPoint toolbar that will appear during your presentation if you have downloaded the add-in, and spin the wheel or select from the card view! It’s easy and exciting.
To get names inside the Name Picker, you can either:
- Add the class list yourself by creating a saved class.
- Have your audience members join your class from their device using the class code in the top right-hand corner of your presentation. If they join live, you can also run interactive response questions.
Learn more about PowerPoint Name Picker tool from this video.
If you have any questions or want to see these codes in action, take a look at the video above for a full walkthrough of all the different ways to randomly shuffle PowerPoint slides. Also, playing with code can be tricky, so let us know in the comments if you have any questions; we are happy to help!
Where can I copy the code?
Copy the code from above, or from the linke here: http://bit.ly/3Dvmdjc
What if I want to continue using shuffling even if all the slides are already presented?
Depending on which code version you are using, begin your process again by putting the slide number you want to begin with, in the () within this line: ActivePresentation.SlideShowWindow.View.GotoSlide (1)
Can I shuffle by sections?
Yes! Make the range of slides in your Macro the range of your slide numbers in the section you want to shuffle. Then, make a new Macro for your other sections. Label the Macros by section and select the right Macro when adding your buttons to the slides.
